Wednesday, December 26, 2012

Doll Sleeping Bag and Pillow

I decided to do some bedding as gifts for Christmas (and can post this now!) and went searching online for inspiration/patterns/ideas.

I came across Mama Pea over on peas in a pod who has an amazing step by step tutorial - check it out here.  It was inspired by Vicki Walker of Expert Village who has several videos on you tube.  I also found a tutorial about pillowcases on Christine's blog - from an igloo.

I took a look at all the available inspiration (pinterest etc) and decided to follow "Mama Pea's" measurements and got started.

Now before you decide this post isn't for you..... I don't have any fancy gadgets i.e. a rotary cutter or a self healing mat big enough to use to cut material (I used my Fiskars 17x11 mat), or one of those wonderful quilters rulers or a quilting foot for my little sewing machine or any knowledge of patchworking!
So armed with my Fiskars scissors (featured above in the first photo), a school ruler, pins and determination I set to work.  

I should mention that before this the only thing my sewing machine had actually sewn was paper!!!!!

Okay... background picture painted!!!

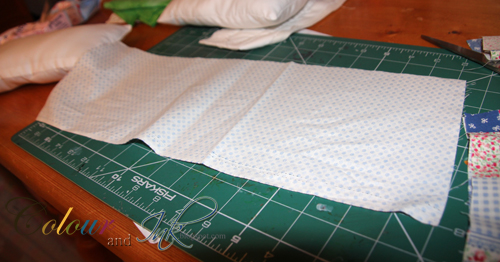
I cut templates from newspaper - 21 inches x 13 inches (folded) or 21 x 26 (open).  I wanted to be able to make the best use of my fabric and make sure I didn't mess up!
I cut my top fabric, middle layer - fleece material and backing fabric using this template and then pinned them together at intervals.
I then stitching horizontal lines across the layers (you may see the pins are still in place).
I then rounded the corner of the layers (I used a chocolate lid as my template!).
Pin the bias binding on the top half of the sleeping bag pulling at the corners to create a rounded corner.
Machine stitch - then unpin and hand stitch the bias binding on the back/inside.
The next step is to put the bias binding over the two layers of sleeping bag (basically "sandwiching it together"!).  Don't you just love my technical terminology!!!!
 I wasn't too confident at this so I tacked the bias binding front and back with white thread so I knew that I had secured it on the back as I machine stitched.
I then added a button where the bias binding joins - you could add a bow if you wanted.  I put my Fiskars scissors next to the sleeping bag so that you can get an idea of scale.

For the pillow

I worked out my dimension (10 inches by 6.5/7 inches).  I used a long piece of fabric (20 inches by 6.5 inches) as that was what my scrap was!  I then cut two pieces to create the edge/open end of the pillow.
 I pinned the edging with wrong sides facing.
 Below are both pieces reading for machine stitching.
 I then placed them right side to right side and machine stitched.
When turned and pressed I then ran another line of stitching on top.
 
 I had already made an insert for the pillow using some cotton scraps (read hubby's old shirt!) - filled with toy stuffing and top stitched the end closed.
 I got so proficient! I made a second one in red!.
Two sleeping Bags and pillows ready for gifting!

Friday, December 21, 2012

Happily ever after....

Supplies: pp and cardstock - Simon Says Stamp October Card Kit
PTI Love Lives Here sentiment, Pin - Making Memories, machine stitching, 
Spellbinders heart dies, pop dots, tuxedo black ink - Memento, 
roller adhesive and 6x6 card blank.

I wanted to share a quick and easy Wedding Card I made using the products from the October Card Kit from Simon Says Stamp.

I cut hearts using a Spellbinders Die and lots of machine stitching!  I was inspired by Lucy Abrams card here.

Hope you have a wonderful day. School holidays start in 25 mins ... yipee!!! Happy Friday!  Thanks so much for stopping by!

Thursday, December 20, 2012

Out with the old, in with the new!

Supplies:  Clementine by Kraftin' Kimmie Stamps, Aspen Frost pp - Basic Grey -
Simon Says Stamp Card Kit, copics, glossy accents, PTI die, 
machine stitching, pop dots, tuxedo black ink - Memento 
and roller adhesive.

Out with the old - in with the new! (New Stamp/pp's - Old die/old sewing machine!)


This week on Paperplay we are very kindly sponsored by Kraftin' Kimmie Stamps.  Kim very kindly sent me a beautiful new stamp from her new release - "Clementine".  I got inking and made this fun card using my copics, glossy accents and papers from the Festive Holiday Card Kit from Simon Says Stamp.
I did a couple of layers on the juggling clubs so that they had a depth to them and were raised as they would be in real life!.

I used a die from Papertrey Ink and lots of machine stitching and layering.  I wanted the image to take "centre stage" so didn't add any additional embellishments.

Be sure to check out what my teamies created right here.  Hope you get to play along.

Thanks for peeking.

Tuesday, December 18, 2012

Merry Christmas!

Supplies - Decorative Ornament Stamp CG226 - Hero Arts,  
Snowflake punch - Martha Stewart, Opaque White Color Mist - 
Mister Huey's, Sail boat blue acrylic Paint - Adirondack 
Brights by Ranger, White Enamel - Ranger, Blue 
Cardstock, Faded Jeans Distress Ink - Tim Holtz, 
White Cardblank - Anita's, Roller Adhesive 
and machine stitching.

I dug out some of my Hero Arts Stamps (one of my favourite companies!) to create this card.  I painted a layer of acrylic paint directly onto the stamp and stamped onto kraft.  I waited until it was dry and then cut leaving a border.  I added dimension on the ornament using white enamel by Ranger.

When completely dry I machine stitched it to the base (which I had already "splattered" and let dry) and then raised it on pop dots for added dimension.  The sentiment was stamped on white cardstock and I cut out a notch to make it into a banner.

Layered onto blue cardstock and added white snowflakes (Martha Stewart Punch).  Thanks so much for peeking.

Challenges
Card Mania - Snowflakes
Made Especially for You - Use 3 Snowflakes
Simon Says Stamp - What's your favourite - Hero Arts/stamping technique

Hope you have a wonderful day/evening - thanks so much for stopping by.

Friday, December 7, 2012

Snowflakes!

Today I want to share a card I made with the Simon Says Stamp Card Kit Festive Holiday 2012.  I added some wooden snowflakes and pearls from my stash.

I cut the patterned paper to size and wiped white acrylic paint around the edge to distress.  I layered it on red cardstock (from the kit also) and adhered to a 5.25 x 5.25 in card base.  I added the Basic Grey Aspen Frost die cut shape/sentiment with pop dots, added the painted snowflakes (again with the white acrylic paint) and added pearls to the paper/snowflakes.

Challenges
Simon Says Stamp - Snowflakes
Shopping our stash - Winter Holiday or Snow/Winter Theme
Christmas at Sweet Stampin' - Anything Goes

Thanks for peeking - hope you have a great day.

Thursday, December 6, 2012

Christmas is Coming ...

Supplies:  pp, chipboard accents, layered chipboard - 
Blitzen Collection by Bo Bunny, 
Merry die and sentiment - PTI, fired brick 
distress ink, machine stitching, 6x6 card blank, white gel 
pen and roller adhesive.

This week's challenge on Paperplay is "Christmas is Coming" 
and we are very kindly sponsored by Simon Says Stamp.
I added depth by layering chipboard accents on top of the patterned paper.  I opened my new dies from Papertrey Ink and ran some white cardstock through my Big Shot.  I adhered to the pp with machine stitching and stamped the remainder of the sentiment with fired brick distress ink. 

You will notice my machine stitching is loose - have been using my sewing machine for a non paper project and have to realign my tension! Takes a few days for the machine to catch up!

Challenges
A Passion for Paperplay - Christmas is Coming
Top Tip Tuesday - Christmas
Created with Love challenges - Christmas Blues

Thanks so much for stopping by - hope you have a wonderful day.

Wednesday, November 28, 2012

A Special 70th!

I had to create a special 70th Birthday Card recently and this is what I came up with - a masculine trifold card.  

I used the Hero Arts Digital Kit - Sillyscape - printed it numerous times, cut it out, coloured sections, layered it, stamped 70 (digit stamps by Papermania) over one print out, cut out the numbers and coloured them to make the numbers "pop".  I adhered these to the base with foam squares - I forgot to take a side view of it before it was handed over!  The little hedgehog (hedgehopper) in the plane is by Penny Black and I coloured, fussy cut and added glossy accents to the hearts and goggles!.
The world is part of a digital stamp By LORi Designs - the little plane and boat are by PTI.  I coloured with copics and added the dotted line with white gel pen.
 Then the full "skyline" was revealed when the card was completely opened.
 I printed the message directly onto the clouds background (Hero Arts Digital kit!).
I layered some of the buildings for dimension and added glossy accents to the clock face.  I erased the message on the inside for privacy reasons (hope you understand).

Challenges
Come and Get it - More than one fold
Here Come the Boys - Birthdays Only
Pile it On - Anything but a Christmas Card
Simon Says Stamp and Show - A project with heart

Thanks for peeking.  Sorry I have been absent from blogland - hope to rectify that over the coming weeks.  Thanks so much for stopping by today - I really appreciate all your comments. 

Thursday, November 8, 2012

Snowflakes

Supplies:  A6 Card blank - Anita's, Embossing Folder - Papermania, 
Sentiment - Waltzingmouse Stamps, Black Tuxedo ink - Memento, 
Wooden snowflake - Trimcraft UK, kraft cardstock - Bazzill Basics, 
pop dots and roller adhesive - Tombow.

This week's challenge on Paperplay is "Snowflakes".

I embossed white cardstock, put it on pop dots and layered it for added dimension.  There are wooden shapes all over the crafting world at the moment and I have lots of favourites!  I found these in a local craft store and decided they would be perfect for this Challenge.

Challenges
Everybody-Art Challenge - Embossing
 Created with Love - Christmas (no green or red)

Thanks so much for stopping by - hope you have a wonderful weekend.

Monday, November 5, 2012

Happy Mail from CAS-ual Fridays Stamps - thank you!

Not the biggest fan of Mondays - particularly after a week's vacation but this package put a smile on my face this morning when it arrived as I was bustling the boys off to school.

Thank you CAS-ual Fridays Stamps / Michele for the amazing stamps.  I won them recently during the launch/release of a brand new stamp company - CAS-ual Fridays Stamps.  If you missed the announcement / first day launch see here.

Be sure to check out the amazing stamps and fabulous creations.  The CAS-ual Fridays Challenge continues here.  Best of luck to Michele on her new adventure.  Off to get inky!  Hope you have a wonderful Monday.

Friday, October 26, 2012

La-La Land Crafts Inspiration Friday - Halloween


I used lots of fun dies by La-La Land Crafts to create this Halloween Card.

I inked all the edges with tea dye distress ink and then added pearl paint with my finger to the fence, house and background patterned paper.  I added machine stitching in orange to the pp, kraft cardstock and fence.  I punched a circle/moon, stamped the sentiment, inked with tea dye and added crackle accents.

The pearl acrylic paint almost looks like cobwebs in real life!

Thanks for peeking - check out what the rest of the DT created here.

Thursday, October 25, 2012

Butterflies & Bees

Supplies:  Kraft Cardstock - Bazzill Basics, White Cardstock - Anita's, 
sentiment - Waltzingmouse stamps, white embossing powder, 
versamark ink, pearls, butterfly punches - Martha Stewart and 
roller adhesive - Tombow.

This week's challenge on Paperplay is "Butterflies and Bees"

I decided to make lots of little butterflies and place them tone on tone and make them look like they are flying or just fluttering momentarily before they head off on a further adventure!

I decided to add the sentiment "Congratulations" to this card as it could be for a Wedding/Anniversary or Engagement.

Challenges
Crafting when we can - Wedding Celebrations
The Paper Players - Frames/Framed

Thanks for peeking.  hope you have a truly blessed day.

Saturday, October 20, 2012

Happy Holidays!

Supplies:  Christmas Elf Luka - La-La Land Crafts, Holly Fourish Die
La-La Land Crafts, pp 'Tis the Season collection - Kaisercraft, water 
colour pencils, white gel pen, Crackle Accents, machine stitching, 
pop dot, kraft cardstock - Bazzill Basics and Brown cardstock - Papertrey ink.

This card features the fun Christmas Elf Luka by La-La Land Crafts.  I stamped him on kraft cardstock, coloured with watercolour pencils and white gel pen.  I matted and layered patterned paper by Kaisercraft on a dark chocolate cardstock by PTI.  The holly flourish is a new die by La-La Land Crafts - check it out here.

The tiny buttons are from Button it.  I added crackle accents to the arrow and circle and layered with pop dots/roller adhesive.

Thanks so much for peeking - hope you are having a wonderful weekend.

Challenges
Chocolate, Coffee & Cards - Stitching
ABC Christmas Challenge - Up to you/Anything Goes
Simon Says Stamp and Show - Your Favourite (I love working with monochromatic colours and stamping on kraft)
Try it on Tuesday - Autumn Colours

Friday, October 19, 2012

La-La Land Crafts Mini Release and Sandie's Sketch

Copics 
Skin YR000, E00, E21, E53, Y21, E95
Lips R85
Hair E35, E57, E59
White gel pen
Diamond Stickles

Sandie's Sketch
Another Inspiration Friday over on La-La Land Crafts and a mini release too!

I used New Years Marci for this fun card and Sandie's Sketch.  You can check out what the rest of the DT Gals created right here.
I used the Street Lamp Die and Filigree Corner Die by La-La Land Crafts.

Don't forget, you can enter your card into the Customer Gallery to be in with a chance of winning a monthly prize. Did you know that La-La Land Crafts are on Facebook and Twitter (@lllc)? Check out their FAN PAGE on FB where you will be first to hear of special offers and new releases!!

Other supplies
DeLovely Mini Deck - Cosmo Cricket
roller adhesive
pearl heart - Hobby House
pink buttons - Papertrey ink
pink ribbon - Paperchase
pop dots
machine stitching

Thanks so much for stopping by - hope you have a wonderful Friday and weekend ahead.

Friday, October 12, 2012

La-La Land Crafts Inspiration Friday - Christmas in October

Colouring Medium - Staedtler Water colour pencils, tea dye distress ink and white gel pen

Another fun Friday with La-La Land Crafts.

I used Christmas Elf Luka for this fun card along with the wonderful Christmas Tree Die by La-La Land Crafts.  I stamped on kraft paper and then coloured with watercolour pencils and a white gel pen.  The tiny buttons I picked up at the NEC in Birmingham last March.

The monochromatic challenge on the La-La Land Crafts Facebook page ends October 12th at midnight PST - go check it out!.

Don't forget, you can enter your card into the Customer Gallery to be in with a chance of winning a monthly prize. Did you know that La-La Land Crafts are on Facebook and Twitter (@lllc)? Check out their FAN PAGE on FB where you will be first to hear of special offers and new releases!!

Thanks for peeking - hope you have a wonderful day and weekend ahead.

Other supplies
Patterned paper - Tis the Season Collection - Kaisercraft 
Kraft paper - Bazzill Basics
buttons - button it
machine stitching
pop dots
tea dye distress ink
blending tool
roller adhesive

Thursday, October 11, 2012

Simply Cute!

Supplies:  pp Out of the Blue Collection - Lime Twist MME, 
A6 Card Blank, Anita's, button - Basic Grey, Ribbon - Paperchase, 
copics, glossy accents, pop dots and machine stitching.

This week on Paperplay we are very kindly sponsored by Stamp Fairy and I have used this fun image called "Tommy Sports 5" - the whole collection is available here.  The challenge this week is "Simply Cute".

I coloured the image with copics, added glossy accents to the helmet and then matted and layered with coloured cardstock.  I machine stitched the patterned paper to the card blank with black thread and added white gel pen to "Tommy's" cheeks!
Thanks for peeking - be sure to check out what my fellow teamies did with the cute Stamp Fairy digis here.  We hope you get a chance to play along with our "Simply Cute" Challenge.

Wednesday, October 10, 2012

New Addition!

I have been missing from blogland recently - here's why!

We welcomed "Clarly" into our home last Friday and before that we were busy "puppy proofing" our home!.

She is 7 weeks old and is a Lab x G. Retriever.  She is adorable and is settling in well.

We are puppy walking for the Irish Guide Dogs for the Blind - if you want to learn more check out the link here.

Thanks for stopping by - I will try to pop by everyone's blogs over the coming weeks, there just aren't enough hours in the day at present!

Friday, October 5, 2012

La-La Land Crafts Inspiration Friday - Heavy Metal

Copics
Skin - E00, E21, E53
Lips - R85
Glasses - R46
Hair & Bow - E15, E25, E33, E35, E55, BG13
Gloves, Bag and Necklace - R46, YG95, 100, BG23
Legwarmers - R85
Shoes - W3, W5

This week's inspiration is "Heavy Metal" - I just loved Hunny Bunny Marci and decided to use her to create a fun card with a metal word. 

I added hand stitching with embroidery floss to attach the word to the cardstock.  I then stamped "Hunny Bunny Marci" a number of times on patterned paper from the "Happy Go Lucky" collection and paper pieced Marci's fun outfit.  I just had to add googly eyes to her hat!

Thanks for peeking.  Be sure to check out what the rest of the DT created here.

Other Supplies
metal word - M&S
Patterned Papers - Happy Go Lucky - Lime Twist, My Minds Eye
embroidery floss
roller adhesive
googly eyes
pop dots
white gel pen

Friday, September 28, 2012

La-La Land Crafts Inspiration Friday - Lace & Pearls

Copics
Skin - YR000, YR00, E00, E21, E53
Lips - E93, E95
Hair - E18, E25, E31, E33
Tights and Boots - RV34, E25, E31, E33, E49
Lamp - C1, V15, BV25, BG01, Y28

 I had lots of fun creating this card with Christmas Lantern Marci.  I paper pieced her using pp by Basic Grey.  I always struggle when I have to use lace on a card so I decided to create a layered lace dress for Marci.
Here are the various components before I coloured the card with copics and then paper pieced her ensemble.

Don't forget, you can enter your card into the Customer Gallery to be in with a chance of winning a monthly prize. Did you know that La-La Land Crafts are on Facebook and Twitter (@lllc)? Check out their FAN PAGE on FB where you will be first to hear of special offers and new releases!!

 Thanks so much for peeking - be sure to check out the amazing DT creations here.
Other Products
Patterned Paper - Kissing Booth - Basic Grey
Ribbon from Etsy - MemrieMare
Trinket heart pins - Maya Road
Pearls - Crystal stickers - Mark Richards
Scallop borders - Spellbinders dies
machine stitching  
pop dots and roller adhesive - Tombow

Thursday, September 27, 2012

Flowers and Lace

Supplies:  Square Kraft card blank - Papermania, pp Love Me collection
 by My Mind's Eye, lace and ribbon from stash, machine stitching, 
Sentiment - SRM sticker, pearl hearts - Hobby House, buttons from 
Cork Art Supplies, Tag die - Tim Holtz and roller adhesive - Tombow.

This week's challenge on Paperplay is "Flowers and Lace".

I always cringe when I see a lace challenge - I don't know why but it is waaaay outside my comfort zone.  I picked up a couple of sheets of this fun banner paper by My Mind's Eye in Cork Art Supplies recently and decided to use it for this challenge.

We are very kindly sponsored by Create with Kate this week - check out all the details and DT creations right here.

Challenges
Crafty Cardmakers - Lace and Stitching
Simon Says Stamp - Anything Goes

Thanks so much for peeking. 

Monday, September 24, 2012

A Butterfly "Thank you"

Supplies:  pp - Bubblegum Hills Collection - Kaisercraft, 
Kraft cardstock - Bazzill Basics, Quikutz polka dot 
embossing folder, Beautiful butterflies die - Stampin up, 
SRM Sticker, Papertrey Ink half and half Die, Fiskars
 Upper Crest Border punch, pop dots, A6 Card blank - 
Anita's, Pink button - Papertrey Ink and corner punch.

A quick share today - using up some scraps with lots of embossing, punching and dies!  I had fun with this one.  I paired hot pink and orange and added a little aqua to the mix!

Challenges
Simon Says Stamp - Emboss it!

Thanks for peeking.

Friday, September 21, 2012

La-La Land Crafts - Halloween & Christmas New Release

I am sure you have spotted the amazing new stamps and dies NOW SHIPPING - if not go check out the DT's creations here.

 Copics used
Hat R27, R37
Pants E57, E59
Sweater G21, YG63
Hair E33, E35, E57, E29
Skin YR000, YR00, E00, E21, E31
Boots E08, E15
Gift Y91, Y28
Tea Dye Distress ink and blending tool

I used Christmas Present Luka and the wonderful Christmas Tree Die to create this card.  I inked the edges of all the patterned papers (Kaisercraft) and tree with tea dye distress ink.  I popped Luka on top with pop dots for added dimension. 

As you can see I had lots of fun creating with these amazing stamps and dies.

I wanted to showcase how amazing the new dies are - so above is a card featuring the Christmas Tree die that I reckon you could mass produce (maybe with less machine stitching) for your holiday cards! 

Here's the entire collection - to go shopping - click here.
Thanks so much for stopping by - I love to read all your comments.  Hope you have a wonderful Friday and weekend ahead.
Related Posts with Thumbnails
 
Animated Social Gadget - Blogger And Wordpress Tips